Tuesday, September 17, 2013

30 Some Years and Counting...

What is the oldest piece of furniture or home decor item in your home? Think back to when you moved into your first home or left for college. For some, it might have been 2 years ago, others..... a while ago....decades even.

As I sit here trying to think what it is I have, I realize that I am a furniture rotator.  I just don't like to keep the same thing around too long.  However, I do have a very nice curio cabinet that I bartered for when my husband and I bought our first house.  He wanted a pool table, I wanted a curio cabinet! Probably my first bartering experience:)

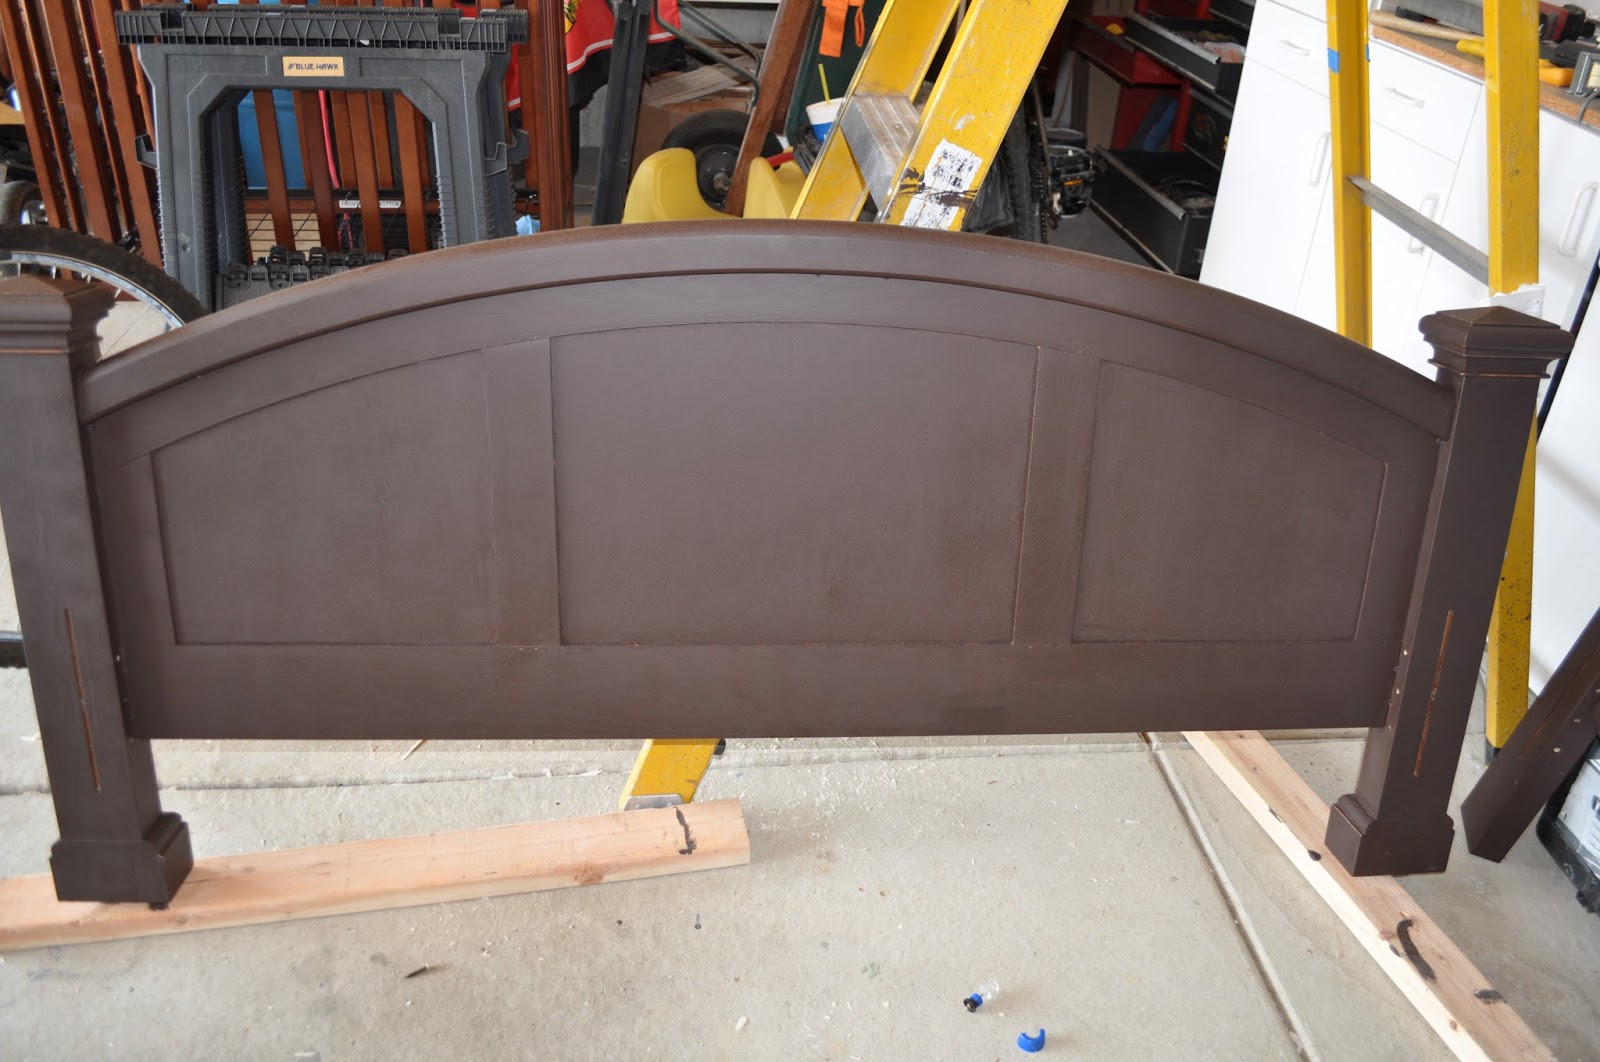
My neighbor asked us to paint her mom's queen sized headboard.  It has a lot of history!  She told me that her parents bought it together 30 some years ago at Tilles Furniture in Munster, Indiana.  Sadly, Tilles just announced they are going out of business after 40 years.

I received the picture below and thought is was a little dated, but would it look great painted and distressed. I immediately thought... Old White from Annie Sloan Chalk Paint®.


When I saw the picture, I thought it was wood.  Boy, was I wrong.  That baby is heavy and made of steel! Super heavy.  I couldn't even push it by myself to the other side of the garage to my workshop. So, she got painted exactly where my husband put her.  

I started with the first coat on a very hot humid day. When I came back to look at it a day later, the paint sort of crackled. Ooops.... maybe I shouldn't have painted it out in the heat so I sanded it down and started over.  Came back the next day.....crackle.  The more I examined it, the more I realized it was actually the texture in the headboard and the more I looked at it, the more I loved it.  The more I sanded to antique it, the better it got!


My apologies that I didn't stage for a better looking picture. As you know, we will have a small workshop at the new shop. For now, it's the garage for me and sometimes the living room.
However, I don't think it negates the fact that the headboard turned out fantastic...(If I do say so myself:))

Sunday, September 15, 2013

It's a Girl! Wait...a Boy! OH! TWINS....Uh..Not Quite

The Twins....ah.. they are so beautiful!  Oh wait... I don't have twins! I'm pretty sure the other Kath doesn't either...hmmm...maybe:)

We have been doing a large custom job for a great lady, Karen.  She wanted her tall dresser, headboard, footboard and two night stands painted a dark "Black Bean" color. No problem!  

Karen entrusted her nightstands to our care one evening.  In a lovely, fabulous oak color, these, of course, needed a little growing up and grooming.  They were in great shape but needed to be 'refreshed'.  They sort of reminded me of a newborn baby. You know~ when it's first born-- sort of wrinkly, red, with a cone head and you really can't tell if it's just cute because you think it should be cute. Then, after an hour or so later, they start to grow on ya and then your like--OH! He really is cute!  

Ok..so maybe that doesn't make all that much sense or maybe it does, however, I couldn't wait to get my hands on the twins... um, yea, the nightstands, and started working on them right away. I popped off the old hardware and lightly sanded them.  Oh...wait! Did you really think I forgot to take a before picture? Ah-hem.... well, no, not really!   Darn...OK... I did! Karen, did not though:)

The drawer was taken out but you get the idea.

See what I mean about the lovely golden oak?  I cannot lie... I have many pieces that are same color.  Lovely furniture ~but, eventually, it just needs a new look.  This is where Sandpaper comes in handy:)

After a few days of spoiling the twins and giving them great attention, in my kitchen no less, they took on an entirely new look. 


See what I mean?  Cute and adorable! Karen wanted new hardware so we ordered the nickel bin cup pulls and they look perfect. I think they give the furniture an entire new, fresh look. 

Here are the twins and the finished product:


When these beauties were delivered, in trusty ole Bessie, with the 2 best delivery guys around (our husbands, of course), we...umm yea..,they, picked up the bed frame and the twins big sister (the tall dresser).  


We painted a few coat of Black Bean and Varathane Matte Poly, the big sister turned out just fantastic as the nightstands.  I'm so happy we distressed the furniture a little. Although they look quite modern, I love the way they are antiqued just enough to give it a special, unique feel to it.

And yes.... I did paint the dresser smack-dab in the middle of my living room.  I love summer! I love the hot weather, but when it is 90 plus degrees outside, sweating to the point of dripping is not something I am fond of doing. A girl has to have standards, right!


The head and footboard, unfortunately received the short straw and had the pleasure of being painted in the garage late when it cooled down a bit outside. Painting them in my house was an option but, I have to say, these beauties were heavy and a little bulky.


So even though my house was being taken over by Black Beans, I loved painting it this set.  The furniture was in the BEST shape!  I think it turned out awesome and cannot wait to receive a picture of all of it's space. 


Saturday, August 17, 2013

Olive U!

Olive U!  Well, if you say it really fast it does sound like "I love you", right? OK...maybe not! Maybe just a little!? :)

This next custom job we painted was just an ordinary older chair.  Nothing fancy about it.  Here is what it originally looked like:


These are the type of jobs we love!  Transforming something that needs a little attention and making it look new.  

Erika already had the fabric she wanted to use for the chair pad, seen above, in a warm leather brown.    
She had a great swatch of earthy colors she wants to use in her space, so I matched the paint to one that she already picked out from a local paint store. We decided to go with Olive Annie Sloan Chalk Paint®. 


Olive in its true form was a little too dark, so we mixed 3 parts Olive to 1 part Old White.  I am always amazed how much I end up loving Annie's colors once I paint something with it.  I have never used Olive before and really didn't have an opinion about it. 

As you can see from the below pictures, my kitchen (yes, that was my studio this past week), is painted fairly similar to Olive. The chair fits perfectly, right?  Hmmm, I thought to myself....  Maybe I could tell Erika a disaster occurred, the chair suddenly disappeared! or... It got up and walked away on its own.  (OK... totally joking! Maybe! ...uh, not really!)  So it got me thinking----Oh, what could I paint in my kitchen in this color!  See the stool peeking at you in the right hand side of the picture in the oak color?  
Yep, I'm thinking OLIVE! Another project, Another Day!


  After sanding the edges to give the chair more character and to draw out the detail, I used Annie's Soft Wax to seal it and buffed it a lot. 


I love how it turned out! The color of the chair pad and antiquing the edges just pulls all the colors together.  

Here is the chair in Erika's home.  It fits right in with the color of the flooring and walls. Looks great! 

Thank you Erika for giving us the opportunity to transform your lovely chair!

Thursday, August 15, 2013

Cheers!

OK... so I was so excited to get started on this project that, yes...I forgot a before picture.

This all happened within 24 hours! My neighbor Michelle told me she was looking for a cabinet to use as bar one evening.  The very next day, we picked up this cute cabinet in ole Bessie and I immediately thought it would be perfect as a bar.  I showed Michelle, we picked a color and I bought the paint.   It was a whirlwind  romance  ~  truly it was.

We were originally told that this cabinet was a bar that they used as a media cabinet.  After working on it for a week, I realized it was just the opposite!  The placement of some of the holes, the flip top and just the wear of the stain, made me think differently. I believe it housed a record player from the get-go.

I have to say, this piece was in really good shape and very sturdy. It didn't need a lot of prep work. I fell in love with the detail and couldn't wait to antique it. Annie Sloan Chalk Paint® does not make a true black chalk paint so I used a flat paint with primer from Behr.  It was pretty nice to work with.

Without further a-do..... here she is--in all her glory!!


 Looks awesome in her new home, right?

This is a picture of the detail on the sides and front of the doors up close without antiquing it. 
Here is a picture after with sanding it just a little to emphasize the rope detail. Just used a simple sanding block and sanded away! Super easy and a great effect.

I had a hard time trying to figure out what type of hardware. I hemmed and hawed over what to get. I almost ordered brushed nickel; however, after I antiqued it and the golden/coppery color came through,  I knew hardware with a copper/bronze color would look great. So, I found these super pretty 'birdcage' pulls.


Now, you probably saw the above picture and wondered.....what in the world is that messy looking paper on the shelves?  Well... I got inspired!  Since this was going to be a bar, I thought it would be fun to line the shelves with drink recipes.  So that is what I did.  I found a copy of the 1935 The Old Waldorf Astoria Bar Book reprint on Amazon. We tea stained the pages to make them look old. (A fairly simple project that my daughter and her friend helped with.)  We just made a few cups of tea and painted the crumpled up pages with the actual tea bags.  After two coats of mod podge and poly each, I think it turned out quite unique. 


I have to say, I keep looking for another cabinet like this one because I just know that I could find a place for one just like it in my house:)


Wednesday, August 7, 2013

School, Organization, and NOT!

School is right around the corner for the Sandpaper kids! In fact, it's on Tuesday.  Oh, I cannot wait!....oops... did I really write that??  What I really meant...... Darn! Shucks! Oh, what a pity!! (insert major sarcasm.)

With school -comes paper. Lots of paper and even more paper. Is there a special organizing system you use?  Here is what my organizing system looks like.........


NOT! NOT! and NOT!  One can dream right? This is compliments of a cute blog called Tobi's Blog.

Here is actually what my organization system looks like at this point and time.


Go ahead! It's OK. You can judge.... I will just say what everyone it thinking. HOLY COW! That looks bad. Yep. It does! Needs a little makeover and some cut backs.   Don't worry, though, plans are in the works to get this baby back in order and ready to go by Tuesday.  

Once, complete, I will gladly share a new picture.  

What do you do to get ready for school? Are there any favorite organizing items you just HAVE to use?  Just make a comment below for all to share.  Perhaps we can get through the mounds of school paper together.

Thursday, August 1, 2013

A Linky What?

A "Linky Party"! Ever hear of it? It's this fabulous new way (or maybe it's old and I am now just catching on) to learn or share your newest recipe, DIY project, home improvement idea or in our case, our painted furniture.  Hopefully, it will be a great way to spread our name and get people interested in our new endeavor.  We submitted our blog post for Amber Gold's Salon.

If you hop on over to Liz Marie's Blog, which by the way is so stinkin' cute, you will get an idea of this cute online party!

Share your newest idea or project with her and don't forget to post it back in our comments.

Friday, July 19, 2013

Stripped Down and No Place to Go....

Come on now! Don't be thinking dirty! Did you really think the girls of Sandpaper would put up a post about something naughty? OK--naughty, no. Dirty--maybe.  BUT, not in the sense you think. Dirty as in dirt, mud, messy, unclean...you get the picture.  Alright, maybe you don't get the picture. So here is one for ya:
What a BEE-YOU-TEE! This baby was just calling our name. It is massive and has TONS of character. So we scooped her up and brought her to our workshop. (OK, so we don't have a workshop but Kath O's garage will do for now.)  One day! One day very soon our shop will be come a reality.

Once we got her home in ole' Bessie, our old white trusty van, on a crummy- wet- dreary- June day, the ideas started to spew.  We really didn't have a particular design or color in mind. So, we started a deconstruction project because we wanted it to be open shelving.  Could we buy a cabinet that actually was open shelving? Absolutely! Would it be as much fun transforming it into what exactly we want? Heck no! So we got to work.

Since she came in two pieces, we took her apart.  Once we did, we noticed there was a little water damage to one side.

Even after sanding the top, it just wasn't looking or turning out how we wanted so we decided to buy a new top and put it on. 

We then pulled all the doors off and glass on the sides to create the open shelving look.


As you can see in the second picture, the bottom shelf was damaged so we put new wood down.  We also had to reinforce the shelves with metal brackets.

Once we finished prepping it, we decided to paint the inside shelving with Graphite.  The outside received Old White.   Here she is with one coat of each.

At this point, we left her to sit because we devoted our attention to the Amber Gold Salon project seen in our previous post.   When we finished her project, Amber expressed the need for a display cabinet.  We immediately thought! HUTCH!  She needs it! So...we went and spent the next week paying a lot of attention to tailoring it to match Amber's decor.  

We took the gold metal door designs and re-purposed them on the side panels. We used a staple gun to secure them. LOVE air compressor tools:)

We lined the bottom shelf with some really pretty paper that matched perfectly. (This is a pic prior to us laying it down permanently.) 


We sanded and antiqued the Old White and then waxed it with clear wax and detailed parts with dark wax.


We special ordered glass for the shelving, since it didn't come with it, and put the original hardware back on.


We delivered the hutch to Amber's this past week and just love how it looks with her product line. It also complements the mirrors at each station. 


(Products couldn't be put on the top two shelves because there was a delay with the special order glass.)


We are thrilled with how it turned out! We also love the fact that the hutch found a place to go, instead of sitting in our workshop with no intended purpose.